100 Days on Chunk Bosses, Raids & Totems
Beat Grounder and Pharaoh, survive hunter raids, place totems, and keep lightning from cooking your base.
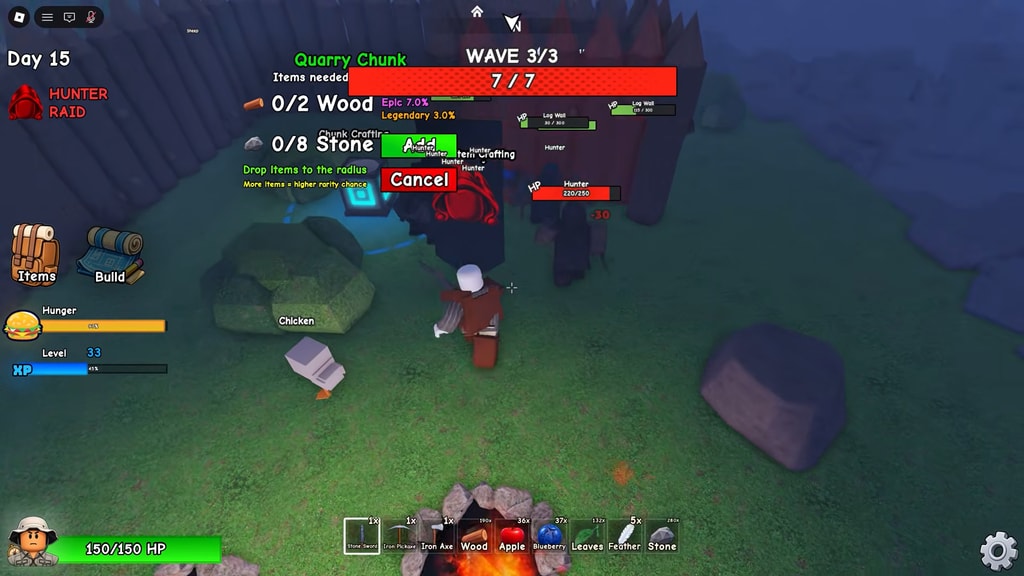
Why bosses and raids decide Day 100
Reaching Day 100 in 100 Days on Chunk is not only about stacking floating pads. Boss chunks drop keys that unlock totems with day multipliers, and hunter raids punish bases that expanded without defenses. If you ignore both systems, nights stay long, raids shred gates, and the calendar crawl feels endless.
This guide covers the early Grounder / Graveyard line, the later Pharaoh / Ancient Ruins line, hunter raid habits, totem placement, and the lightning rod mistake that keeps showing up in playthrough comments. Read How to Get Bones and How to Get Artifact before you craft the arenas.
Grounder and the Graveyard chunk
The early boss path players document most often uses a Graveyard-style boss chunk that summons Grounder. Crafting that chunk typically needs Bones plus common building mats. After the fight, the key leads to a Grounder totem that accelerates days (community reports cite multipliers such as x4—always confirm the live drop text).
Grounder prep checklist:
- Bank Bones from piles and quarry loops (Bones guide).
- Upgrade weapons past wooden scrap; iron or better preferred.
- Stock cooked food and bandages—boss arenas are not the place to learn hunger.
- Wall approaches and place automated crossbows if your crafting level allows.
- Clear inventory clutter so the key and totem pieces do not drop into the void.
Fight tips: kite around solid floors, avoid backing off the chunk rim, and burst when the boss telegraphs long recoveries. After the kill, open the reward path promptly and decide where the totem will live before night falls.
Pharaoh and Ancient Ruins
Later progression opens Ancient Ruins content tied to the Pharaoh fight. Recipes lean on desert materials and an Artifact. Do not start this line until your first multiplier nights feel stable and you have sand plus Artifact banked (Artifact guide).
Pharaoh prep checklist:
- Secure multiple desert clears and the Artifact in a safe chest.
- Bring ranged options if available—Engineer’s starter Crossbow mindset helps even if you play another class.
- Expect a harder arena than Grounder; repair walls the morning of the craft.
- Plan the Ancient totem location with extra void buffers; higher multipliers mean harsher nights.
Community routes often push Ancient multipliers toward higher day speeds (reports mention climbing toward x8). Treat numbers as patch-sensitive and verify in your run summary.
Hunter raids
Hunter raids are multi-wave assaults that can arrive while you are mid-build. They threaten gates, storage, and totems. Stone hunters and lightning-using variants show up in playthroughs as especially nasty early spikes.
Raid survival habits:
- Never leave a new chunk unwalled overnight.
- Keep a kite lane that does not end in a void fall.
- Assign one player in co-op to totem guard while others clear waves.
- Repair gates between waves; a single broken door can cascade.
- Do not start boss crafts at dusk if a raid window is likely.
If raids keep deleting your progress, shrink the footprint, thicken chokepoints, and delay vanity builds until defenses catch up. The Survive 100 Days walkthrough shows how raids fit into early / mid / late phases.
Totems and day multipliers
Totems are why bosses exist for many players: they speed up days so you are not staring at a 100-day calendar with no acceleration. Place totems where:
- Walls and crossbows cover approach angles
- You can reach them quickly during raids
- Lightning rods will not pull storms into the totem cluster
- Teammates understand “defend this first”
Faster days also mean nights arrive sooner in real time. Food production, weapon repair, and wall upgrades must scale with the multiplier or the totem becomes a trap.
Lightning rods — useful and dangerous
Lightning rods protect structures from random strikes by attracting lightning to the rod. Players who plant rods in the middle of storage, farms, or totem courtyards cook their own base. Place rods on the edge of valuable clusters, away from the densest builds, and verify coverage after storms.
If a storm wrecks a freshly placed rod island, rebuild the rod first on a safer pad before restocking chests beside it.
Class picks for boss weeks
- Ninja — dodge and speed for raid kiting (S-tier on the class tier list).
- Vampire — kill-fed combat for aggressive boss takes.
- Engineer — Crossbow start and cheaper crafting levels for arena gear.
- Medic / Chef — safer learning clears if you still die to hunger or chip damage.
Full numbers live on All Classes.
Related pages
Craft boss chunks only when mats, walls, and food are ready. Defend totems like they are the run. Keep lightning rods on the rim. Clear hunter waves before greed expands the island again.
Frequently Asked Questions
Quick answers to the most common questions.
What do I need for the first boss?
Usually Bones plus common mats for a Graveyard / Grounder-style boss chunk. Farm Bones first, then fight with food and walls ready.
When should I fight Pharaoh?
After you have desert mats and an Artifact, plus a stable first totem. See How to Get Artifact.
Why do hunter raids wreck my base?
Unwalled new chunks and thin gates fail under multi-wave pressure. Wall same-day, repair between waves, and guard totems.
Where should I place lightning rods?
On the edge of valuable areas. Rods attract lightning—centering them on storage or totems can destroy your own progress.